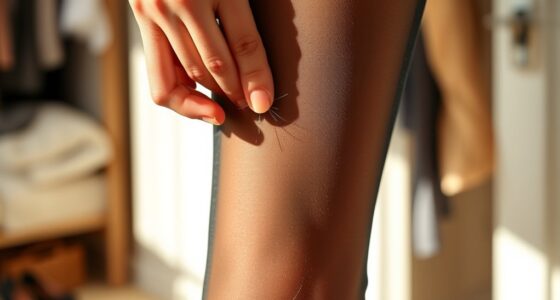
To convert footed tights into footless, start by laying them flat on a smooth surface, ensuring they’re wrinkle-free. Mark your desired cutting line above the heel or at the ankle using chalk or fabric marker. Carefully cut along the line with sharp scissors, then finish the raw edge to prevent fraying, either by sewing a hem or applying fabric sealant. If you want a detailed step-by-step guide, keep going to learn more about achieving a clean, professional look.
Key Takeaways
- Mark the desired cut line above the heel or at the ankle on the tights using chalk or fabric marker.
- Carefully cut along the marked line with sharp scissors, ensuring smooth and even edges.
- Fold the raw edge inward about a quarter inch, then secure with stitches, fabric glue, or sealant to prevent fraying.
- Try on the tights to check the fit and make any necessary adjustments for comfort and appearance.
- Finish with trimming uneven edges and sealing raw edges for a clean, durable, footless design.

If you’ve ever wanted to switch from footed tights to footless ones, you can do so easily with a few simple adjustments. The process is straightforward and requires minimal tools. All you need is a pair of sharp scissors, a bit of patience, and some care to avoid damaging your tights. This DIY method is perfect if you want to customize your tights without buying a new pair or if you need a quick fix.
Start by laying your footed tights flat on a smooth surface. Make sure they’re free of wrinkles or folds, so you can get an even cut. Decide where you want to remove the foot portion. Typically, you’ll want to cut just above the heel or at the ankle, depending on your preference. Use your fingers to gently stretch the tights to see where the fabric naturally thins out or to identify the seam if they have one. Mark your cut line with a piece of chalk, a fabric marker, or a washable marker to ensure precision.
Lay tights flat, identify where to cut, and mark your line for an even, precise removal of the foot section.
Once you’re satisfied with your markings, hold the tights firmly and carefully cut along the line with sharp scissors. Take your time to make a smooth, even cut to prevent jagged edges. After cutting, examine the opening. It’s common for the cut edge to fray slightly, but you can prevent fraying by sewing a simple hem or applying a fabric sealant if you want a cleaner finish. If you prefer a no-sew method, you can use clear nail polish or fabric glue along the raw edge to keep it intact and prevent unraveling.
If you notice the cut edge feels rough or uneven, you can gently trim any uneven parts. For a more professional look, fold the raw edge inward about a quarter inch and secure it with a few stitches or fabric glue. This creates a neat hem that won’t fray easily as you wear the tights. If sewing isn’t your thing, double-sided fabric tape can also work to seal the edge temporarily, especially if you only want the footless look for a short period.
Additionally, choosing the right fabric type can influence how well your DIY modification holds up over time. Finally, try on your tights to check the fit and comfort. Make sure the opening isn’t too tight or loose, and adjust if needed. Keep in mind that this DIY alteration is reversible or can be touched up later if your preferences change. Remember, the key is patience and precision—taking your time ensures a cleaner, more professional look. With these simple steps, you can effortlessly convert your footed tights into stylish, footless options whenever you desire.
Frequently Asked Questions
Can I Convert Any Brand of Footed Tights to Footless?
Yes, you can convert most brands of footed tights to footless. You’ll want to carefully cut along the seam that connects the foot to the leg. Use sharp scissors for a clean cut, and try to follow the existing stitching if possible. Afterward, you might need to reinforce the cut edge with a bit of sewing or fabric glue to prevent fraying. Just be gentle to avoid damaging the tights during the process.
Will Cutting the Tights Damage Their Elasticity?
Cutting your footed tights can slightly affect their elasticity, especially if you cut too much or unevenly. However, if you make a careful, clean cut at the ankle or just above, it shouldn’t substantially damage the stretch or fit. To minimize any damage, use sharp scissors and avoid excessive stretching during the process. Keep in mind that some loss of elasticity might occur over time, but a precise cut usually maintains most of the tights’ flexibility.
How Do I Prevent Fraying After Cutting the Tights?
You can prevent fraying by sealing the cut edge with a quick fix. Try applying a small amount of clear nail polish or fabric glue along the cut edge, then let it dry completely. Alternatively, you can carefully sew a tight zigzag stitch or use a fabric fray-preventing tape. These methods reinforce the edge, keeping it intact and looking neat while maintaining the tights’ elasticity.
Are There Any Tools Required for This DIY Process?
You don’t need many tools for this DIY process—just a sharp pair of scissors, a ruler or measuring tape, and possibly some fabric glue or clear nail polish. The scissors help you cut cleanly, while the ruler ensures precise measurement. If you want added durability, applying fabric glue or nail polish along the cut edge will prevent fraying. These simple tools make the conversion easy and effective.
How Long Does the Conversion Process Typically Take?
It usually takes about 15 to 30 minutes to convert your footed tights into footless ones, depending on your experience. Think of it as a walk in the park—you just need patience and a steady hand. Start by carefully cutting around the toes and heels, then try on to guarantee a snug fit. With a little practice, you’ll master it quickly, saving you time and money.
Conclusion
Converting your footed tights to footless is quick and easy—no sewing required! Just cut along the seam at the toes, and you’ll have a stylish pair perfect for warm weather or layered looks. Worried about fraying? Wrap a bit of clear nail polish around the cut edges for a clean finish. Now, you can enjoy your favorite tights in a new, versatile way without buying new ones—just a simple snip transforms them!