
To fix a run in your tights in just 30 seconds, start by examining the damaged area and cleaning it gently to smooth out the fabric. Apply a small amount of clear nail polish directly onto the edges of the tear, spreading it evenly with the brush for a quick seal. Let it dry for a few moments, then gently test the repair. For extra strength, you can add a small fabric patch on the inside. Keep going to discover more smart tips for seamless fixes.
Key Takeaways
- Examine the tear, then smooth and secure loose edges with a small patch or fabric glue.
- Apply a thin layer of clear nail polish along the run edges for quick sealing.
- Use the brush to spread the polish evenly and let it set for a few seconds.
- Allow the polish to dry completely without touching or stretching the fabric.
- For extra durability, sew a fabric patch on the inside behind the run.

SHARICCA Womens Seamless Underwear No Show Hipster Panties Invisible Lightweight Nuage Bikinis Briefs Microfiber Pack,5P01,M
❤【So Thin Lightweight Microfiber Ribbed Material】 SHARICCA seamless underwear for women is made with 75% polymide and 25%...
As an affiliate, we earn on qualifying purchases.
Gather Your Supplies

To start fixing your run in your tights, gather all the necessary supplies. First, identify the fabric types of your tights, as different materials may need specific approaches. For example, nylon and spandex blends might require delicate handling, while cotton blends are more forgiving. Keep some clear nail polish or fabric glue handy for quick alternative fixes, which can seal small runs instantly. You might also want a pair of scissors or a sewing kit for more secure repairs later. If you’re considering alternative fixes, double-sided tape or a small patch can work temporarily. Having these supplies ready guarantees you’re prepared to quickly address the run, whether you choose a quick fix or plan a more permanent solution. Automation’s role in business intelligence can help you analyze trends and determine the best repair method based on your fabric type.

Caterlove Women's Seamless Underwear No Show Stretch Bikini Panties Silky Invisible Hipster 6 Pack (A, Medium)
SEAMLESS UNDERWEAR: It's made of high quality soft stretchy fabric with 100% cotton health and breathable lining. Fabric...
As an affiliate, we earn on qualifying purchases.
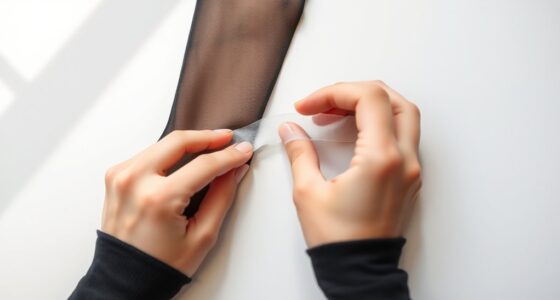
Prepare the Damaged Area
Before you start repairing the run, carefully examine the damaged area to assess its size and severity. Check if the fabric is frayed or if there are loose threads that need securing. To prepare, gently straighten and smooth out the fabric around the run. Consider applying fabric reinforcement behind the tear to prevent it from spreading further; use a small patch or interfacing that matches your tights’ color. Proper preparation guarantees a seamless repair. When selecting reinforcement, prioritize fabric that closely matches the tights’ color for a discreet fix. Avoid handling the area roughly, as this can worsen the damage. Taking these steps ensures your repair will be durable and nearly invisible, giving your tights a fresh look in just seconds. Additionally, choosing the right fabric reinforcement can significantly improve the durability of your repair.

FINETOO 6 pack Seamless Underwear for Women Sexy Low Rise Hipster Wave Edge No Show Bikini Panties Womens Cheeky S-XL
SEAMLESS UNDERWEAR FOR WOMEN: 82% Polyamide 18% Elastance. It is silky and smooth, won't irritate the skin and...
As an affiliate, we earn on qualifying purchases.
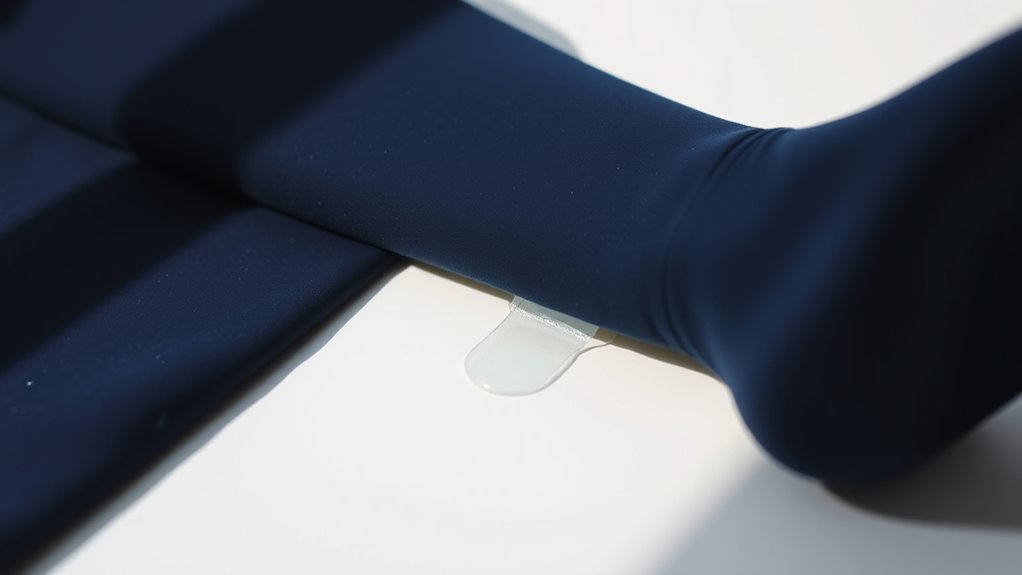
Apply the Clear Nail Polish
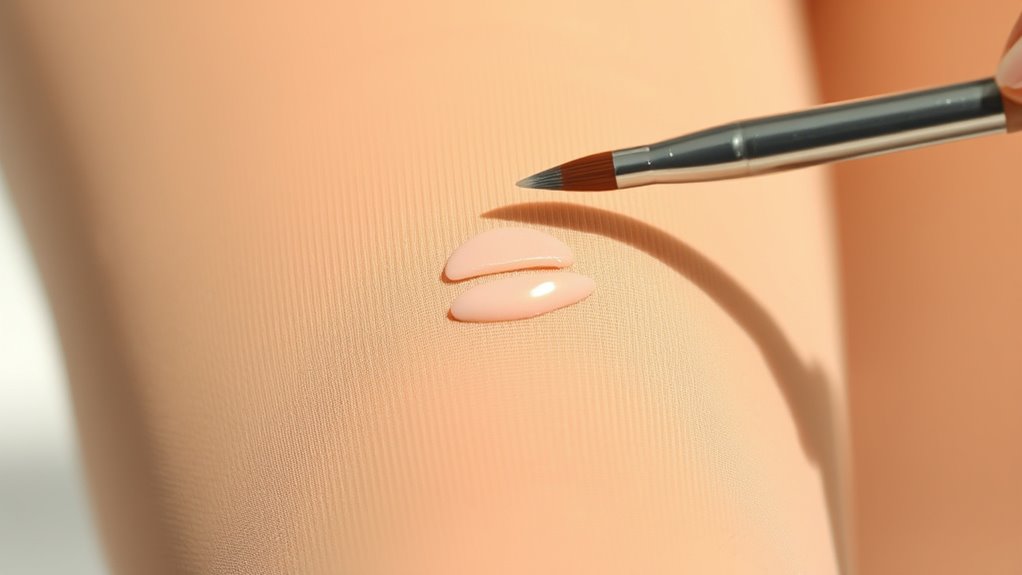
Applying clear nail polish is a quick and effective way to stop a run from spreading further. This method creates a thin layer of fabric reinforcement, preventing the tear from enlarging. To guarantee a smooth nail polish application, follow these steps:
- Carefully dab a small amount of clear nail polish directly onto the edges of the run, covering the area completely.
- Use the brush to evenly spread the polish along the length of the run, sealing the fibers in place.
- Let the nail polish set for a few seconds to avoid smudging.
- Check that the entire affected area is reinforced, adding more if necessary for extra durability.
- Remember that using the right type of nail polish, such as clear nail polish, is essential for a seamless repair and lasting protection.
This simple nail polish application provides a quick fix while reinforcing the fabric to extend your tights’ lifespan.

FallSweet No Show High Waist Briefs Underwear for Women Seamless Panties Multi Pack (Multi6 (5-Pack), Large)
Body:86% Nylon, 14% Spandex.
As an affiliate, we earn on qualifying purchases.
Let It Dry and Check the Repair
After applying the clear nail polish, give it a few minutes to dry completely. The drying time varies depending on fabric types; delicate materials like silk or lace might need extra patience, while sturdier fabrics like nylon or polyester dry faster. Be sure to avoid touching or stretching the repair during this period to prevent smudging or uneven coverage. Once the polish feels dry, gently check the repair by lightly tugging around the run. If the tape or polish holds firm without peeling or cracking, you’re good to go. If it still feels soft or shows signs of movement, give it a few more minutes to fully set. Proper drying guarantees your fix remains discreet and durable, so patience pays off. Additionally, understanding the glycolic acid benefits can help maintain healthy, smooth skin after your repair.
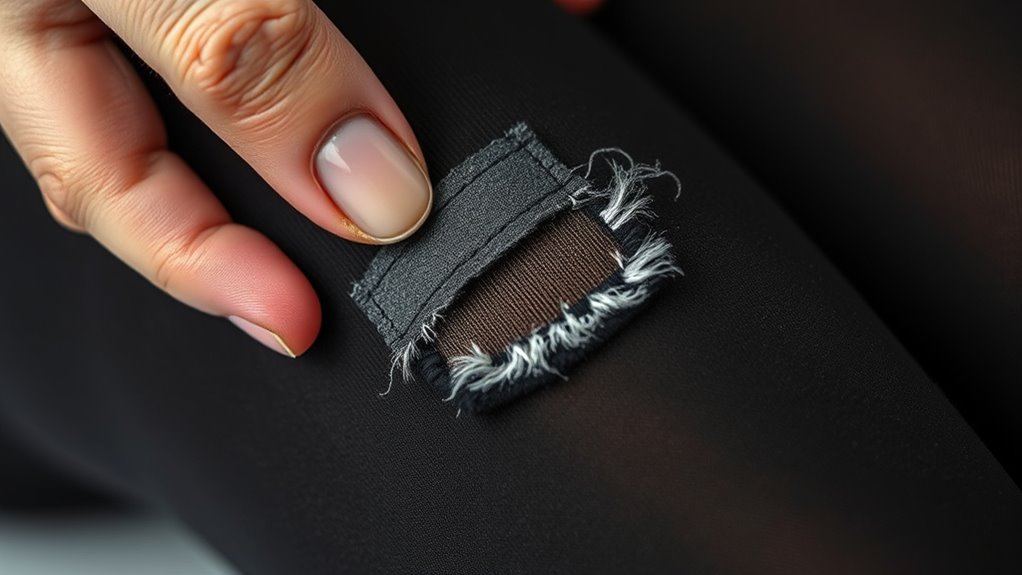
Optional Reinforcement for Extra Strength

For added durability, you can reinforce the repaired area with a small patch of fabric. This fabric reinforcement strengthens the fix and prevents future runs. To do this effectively, consider these sewing techniques:
- Cut a small, matching fabric patch slightly larger than the repaired hole.
- Use a tight zigzag stitch along the edges to secure the patch and prevent fraying.
- Sew the patch onto the inside of the tights, ensuring it covers the repair completely.
- Press the stitched area flat with an iron to set the sewing and improve adhesion.
- Selecting appropriate materials can further enhance the durability of your repair, ensuring your tights last longer.
These steps ensure your tights are reinforced for extra strength, making your repair more enduring. Proper fabric reinforcement combined with precise sewing techniques will extend the life of your tights considerably.
Frequently Asked Questions
Can I Use Other Types of Nail Polish Besides Clear?
Yes, you can use other nail polish shades besides clear, but make sure they’re fabric compatible. If you want a subtle fix, opt for shades close to your tights’ color. Keep in mind that some nail polishes might stain or damage the fabric, so test a small area first. Clear nail polish is safest, but if you prefer a different shade, choose one that matches your tights for a seamless look.
Will This Fix Hold Through Multiple Washes?
A stitch in time saves nine, so your fix may hold through multiple washes if you use the right method. To guarantee fabric safety and long-term durability, choose a nail polish or fabric glue designed for clothing. Keep in mind, some nail polishes might crack or peel over time, especially after washing. For best results, reapply after a few washes and always test on a small, hidden area first.
How Long Does the Nail Polish Need to Dry?
You should let the nail polish dry for at least 15 to 20 minutes to guarantee a proper drying time before handling your tights. This quick fix works best when you give it enough time to set and harden. Rushing the process might cause smudges or damage, so be patient. For best results, avoid stretching or wearing the tights immediately after applying the nail polish to maintain the repair’s durability through multiple washes.
Is This Method Suitable for All Fabric Types?
This method isn’t a one-size-fits-all solution; it depends on fabric compatibility and material considerations. Some fabrics, like nylon or polyester, respond well, but delicate materials like silk or lace may not hold up. Think of it like fitting a puzzle piece—check the fabric type first. Always test a small, hidden area before applying to the entire garment to avoid further damage.
Can I Use This Hack on Large or Multiple Runs?
You can use this hack on larger or multiple runs, but fabric compatibility is key. For delicate or stretchy fabrics, the fix might not hold well, raising longevity concerns. If the runs are extensive, consider reinforcing the area with matching thread or fabric patches instead. Always test a small section first to verify the repair holds and doesn’t damage the fabric further. This way, you’ll extend your tights’ lifespan effectively.
Conclusion
Now that you know how to quickly fix a run in your tights, isn’t it handy to have a simple solution at your fingertips? With just a few household items, you can save your favorite pair and extend their life. Why spend extra time or money when a quick DIY hack can do the trick? Next time a run appears, you’ll be ready to mend it in just 30 seconds and keep your look flawless without the stress.